Monday, October 28, 2013

IVP4406: Methods & Materials (10) - Frottage (art) aka rubbing

this lesson is on texture

homework for the previous week was to make 10 'visual texture' by rubbing white paper; acrylic paper/glass paper/mahjong paper/ computer paper/drawing block paper against rough surfaces.

out of the ten, only these 7 were slightly more unique 

1. metal drain cover in nie


2. Miss Seck's bamboo weave basket


3. the fan at home 


4. keyboard in printmaking room 


5. the back of the cardboard 


6. the rough wall of nie  


7. The tiles in my kitchen  


anyway, there are surface texture vs relief texture. 

surface texture are those above... still 2D and flat but 'show' roughness... 

Intaglio is another form of surface texture and in certain cases, it can be recovered with a gentle rub. ie; scratching the surface of the skin with long fingernails... eeewww... 

there are high vs low relief texture.
low one could be that of a coin surface whereas high one refer to those with a form popping out but still attached to a flat surface

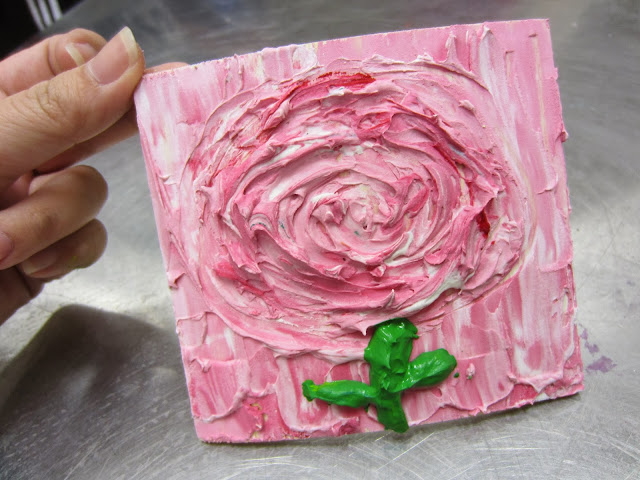
as for the day's lesson was to create 5 physical texture using gypsum on plywood.... 

we were given 5 pieces of single ply plywood each which were cut, with a penknife, out from a 4m by 8m piece that cost approx $4... even cheaper than some of the art paper i buy la... =S 
However, it warped after absorbing the moisture from the gypsum that was layered on it..... alternative was to use the multi ply plywood... do be careful of splinters while cutting it though... 

Click here to order plywood. Minimum order do apply though.


The amazing bucket of gypsum used as art material for the day.... so is this the gypsum that's found in tao huay too???? 


a big big pail of 28kg only cost about $30 and they do come in smaller qty too ... click here to order


do the mixing on wax magazine pages to avoid the headache of having to wash.... the knife can either be replaced by disposable knife or ice-cream stick too.... 


one mega like about david's class is that he gave superb idea on how to minimise the cleaning up after an art lesson which is so very de important for the conduct of primary school art lesson that's less than an hour per week ... =S... 


3 of my creations which are look-able and display-able according to my standard... =P 


my lollipop flower 


white ferry in the Atlantic ice  


for outdoor display:
  • seal plywood with emulsion paint
  • apply wood vanish/ thinner/turpentine over completed work 


~~~~~~~~~~~~~~~~~~~~~~~~~~~~~~~~~~~~~~~~~~~~~~~~~~~~~~~~~~~~~~~~~~~~~~~~~~~~~~~~~~~~~~~~~~~~~~~~~~~~~~~~~~~~~~~~~~~~~~~~~~~~~~~~~~~~~~~~~~~~~~~~~~

wonderful classmates' work that i like


Ocean wave


what big nose u have??? 


pretty pretty flowers 


 rooftop of peanut butter tiles


leather??? croc skin??


luv the sweet colours 


ending the post with a fun shot of our table during the class.... 


this was the blue thingy that angeles was "feeding" me.... doesn't it look like the cream flowers on cake????  too bad, it's gypsum .... =S


more contacts from david for future art shopping spree... =) ... really hope they have e-billing though... 

Acrylic sheets, very good for customization

Industrial stuffs, the alternative is your nearby neighborhood shops

Uber power website for all arty things
http://www.artvark.com.sg/materials.html


~~~~~~~~~~~~~~~~~~~~~~~~~~~~~~~~~~~~~~~~~~~~~~~~~~~~~~~~~~~~~~~~~~~~~~~~~~~~~~~~~~~~~~~~~~~~~~~~


this is part 6 of 7 parts to the series "Advanced Diploma in Primary Art Education". A series of blog posts that are updated weekly (from aug - nov) to document the activities, progress and learning point(s) from the week's lessons... =) 


Part 1 - IVP4401: 2D Exploration 
             (1)(2 - 4)

Part 2 - IVP4402: 3D Exploration 
             (2)(3)(4)(5)(6)(7 - 9) 

Part 3 - IVP4403: New Media Exploration 
             (1), (2)(3&4)(5)

Part 4 - IVP4404: Visual Literacy 
             (2)

Part 5 - IVP4405: Artistic Development of Children

Part 6 - IVP4406: Methods and Materials 
             (1)(2)(3)(4)(5)(6&7)(8)(9)(10) 

Part 7 - IVP4407: Curriculum Development and Assessment 

Friday, October 25, 2013

IVP4406: Methods & Materials (9) - Colour Gamut


apparently,  colour gamut helps artists to produce very harmonious painting that are very pleasing to the eyes... 


Artists Study:
(1) KOREHIKO Hino whose subjects i find rather disturbing, but the  range of colour (tiffany-ish) as shown below makes his artwork rather smoothing to the eyes... if you are really interested in his work, can just click on his name above... 


art task of the day was to produce two harmonious mini oil paintings of the same picture with two different colour schemes by moving the gamut mask around the yurmby wheel... 


was super lucky that David used my yurmby wheel as a demo for the group and created this gamut mask for me to block out the unwanted colours .. =) 


knowing my weaknesses all too well, i was "smART" enough to choose a relatively easy 3 coloured picture for this activity too... heee

it was also to honour Miss Seck's favourite magazine which i think became the class's most flipped book for the semester as well... ;P


this one was up to mark, according to david.... but that's because he helped with mixing of the colour la.... oopx....


as usual, no patience at all to replicate the technique for the second one... =S


online gamut mask tool for those who are not into painting their own yurmby wheel: 


~~~~~~~~~~~~~~~~~~~~~~~~~~~~~~~~~~~~~~~~~~~~~~~~~~~~~~~~~~~~~~~~~~~~~~~~~~~~~~~~~~~~~~~~~~~~~~~~


this is part 6 of 7 parts to the series "Advanced Diploma in Primary Art Education". A series of blog posts that are updated weekly (from aug - nov) to document the activities, progress and learning point(s) from the week's lessons... =) 


Part 1 - IVP4401: 2D Exploration 
             (1)(2 - 4)

Part 2 - IVP4402: 3D Exploration 
             (2)(3)(4)(5)(6)(7 - 9) 

Part 3 - IVP4403: New Media Exploration 
             (1), (2)(3&4), (5)

Part 4 - IVP4404: Visual Literacy 
             (2)

Part 5 - IVP4405: Artistic Development of Children

Part 6 - IVP4406: Methods and Materials 
             (1)(2)(3)(4)(5)(6&7)(8)(9), (10) 

Part 7 - IVP4407: Curriculum Development and Assessment 


Thursday, October 24, 2013

IVP4406: Methods & Material (8) - Yurmby Colour Wheel

This is the colour wheel that i am familiar with and has been teaching my kids about it
and i din know that it has a super low key relative known as Yurmby until David introduced it in class 


went online wanting to find out more about it but was surprise that there isn't much simplified info ..there wasn't even a wiki explanation of what it is... hmmmm!!!... 

~~~~~~~~~~~~~~~~~~~~~~~~~~~~~~~~~~~~~~~~~~~~~~~~~~~~~~~~~~~~~~~~~~~~~~~~~~~~~~~~~~~~~~~~~~~~~~~~

Your color wheel must either represent the ideal world of optical color or the physical world of paints, but no single wheel can accurately represent both color universes.
-James Gurney

~~~~~~~~~~~~~~~~~~~~~~~~~~~~~~~~~~~~~~~~~~~~~~~~~~~~~~~~~~~~~~~~~~~~~~~~~~~~~~~~~~~~~~~~~~~~~~~~

so from the few skimpy blogs about the yurmby that i chanced upon, the quote from david's PPT and my limited art brain, i think it has got to do with colour harmony and how we really see colours given the modern day's pigment and technology.... the more famous colour wheel is based on pigment and paint while the not so famous one is based on light and optical colours.... 


anyway, luv the activity for the day.... paint our own yurmby colour wheel... =) ... no need creativity, no need skill, no need to squint to see the light nor the dark..... just my kind of art.... oopx


sample:
David's version with 7 layers.... he was kind enough to let us do 4 layers only... =) 

and even provided a super duper tool which acted like a compass for the drawing of the circles


Demonstration on how to get the different tones/shades of a hue by adding different grey tones to it


used oil paint for  this activity 
Note: blue --> royal blue, cyan --> ultramarine blue


and since it's oil paint, it doesn't make sense at all to use water and hence linseed oil was use


 Thanks to our very talented and organised Ana who provided a great help in mixing all the colours, i managed to finish painting my very own Yurmby wheel within the lesson... =) 


the grey scale which were used to achieve the different tones/shades

Nice, neat, clean, perfect piece of "art".... i like... =) 


~~~~~~~~~~~~~~~~~~~~~~~~~~~~~~~~~~~~~~~~~~~~~~~~~~~~~~~~~~~~~~~~~~~~~~~~~~~~~~~~~~~~~~~~~~~~~~~~


this is part 6 of 7 parts to the series "Advanced Diploma in Primary Art Education". A series of blog posts that are updated weekly (from aug - nov) to document the activities, progress and learning point(s) from the week's lessons... =) 


Part 1 - IVP4401: 2D Exploration 
             (1)(2 - 4)

Part 2 - IVP4402: 3D Exploration 
             (2)(3)(4)(5)(6)(7 - 9) 

Part 3 - IVP4403: New Media Exploration 
             (1), (2)(3&4)

Part 4 - IVP4404: Visual Literacy 
             (2)

Part 5 - IVP4405: Artistic Development of Children

Part 6 - IVP4406: Methods and Materials 
             (1)(2)(3)(4)(5)(6&7)(8), (9)

Part 7 - IVP4407: Curriculum Development and Assessment 


Friday, October 18, 2013

IVP4402: 3D exploration (7 - 9) - ceramics

Coiling

step 1: make the base with a rolling pin and stick plank to ensure uniform thickness


step 2: 'draw' the shape of the base and remove excess clay


step 3: score (create scratch marks on) the surface with a comb-like objects


step 4: make a few dough stick look-alike  


step 5: score and slip
never use water as the clay will flop


step 6: 'blend' the different layer of coils together to form a smooth surface so as to secure the vessel

then use a flat tool (big ice-cream stick) to smoothen the outside and inside of the vessel with upward and downward strokes respectively.

further smoothen the outside with a kidney piece or credit card


always remember to wrap the half - finished claywork in plastic bag to retain the moisture so that more coils can be added on within a week or so. by allowing the bottom layer to set, it gives the vessel a more solid base for higher levels to be added.


form the shape of any handle and leave it to harden for half an hour before attaching it to the vessel with scoring and slipping.


alternative to using rolling pin is to use the slab machine

i have this slab machine in school... i thought it was a mega print making machine lo.... wahahaha.... how come my other art teachers din tell me despite having done ceramics in nie???? hmmmm

the slab machine will be able to flatten this blob of clay 


into this uniform flat piece in seconds... =)


Hands-on time... =) 


clay --> bisque (biscuit) after the first round of firing


at the glaze station


something went wrong somewhere and my flowerpot ended up as pimple-poked as me.... =S 


Slab work 

Step 1: 
use the slab machine to make huge slabs

Step 2: 
cut out identical shapes for the base and cover of the vessel 

Step 3:


Step 4: 


Step 5: 


a very satisfied Leng with her demo


My mini slab work


range of colour glazes to choose from... =) 


spoilt for choices so used as many colours as possible... wahahahaha 


gloss coated


out of 3 ceramics work, only this one turns out not too bad.... 
phew! at least i get to keep a good one as a souvenir from this course... =) 
~~~~~~~~~~~~~~~~~~~~~~~~~~~~~~~~~~~~~~~~~~~~~~~~~~~~~~~~~~~~~~~~~~~~~~~~~~~~~~~~~~~~~~~~~~~~~~~~


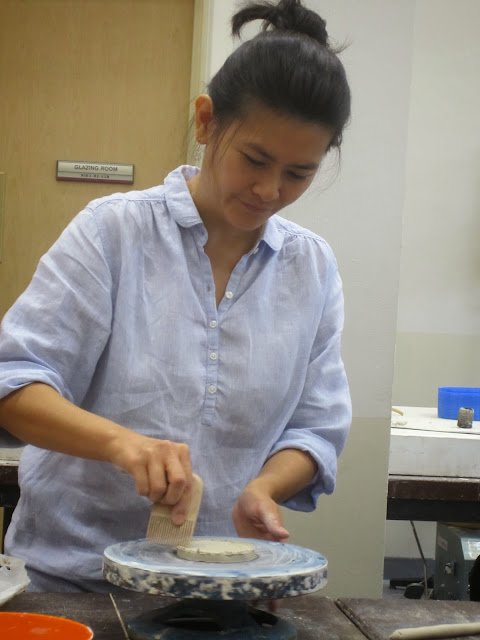
wheel throwing with raku clay, goldish brown.... very pretty colour compared to the which stoneware clay


managed to get this decent thingy only at the 3rd/4th try.... it's really not easy....


so upset..... why got cracks????? and why black black de???? i glaze it white de leh..... haix
~~~~~~~~~~~~~~~~~~~~~~~~~~~~~~~~~~~~~~~~~~~~~~~~~~~~~~~~~~~~~~~~~~~~~~~~~~~~~~~~~~~~~~~~~~~~~~~~


this is part 2 of 7 parts to the series "Advanced Diploma in Primary Art Education". A series of blog posts that are updated weekly (from aug - nov) to document the activities, progress and learning point(s) from the week's lessons... =) 


Part 1 - IVP4401: 2D Exploration 
             (1)(2 - 4)

Part 2 - IVP4402: 3D Exploration 
             (2)(3)(4)(5)(6)(7 - 9) 

Part 3 - IVP4403: New Media Exploration 
             (1), (2)(3&4)

Part 4 - IVP4404: Visual Literacy 
             (2)

Part 5 - IVP4405: Artistic Development of Children

Part 6 - IVP4406: Methods and Materials 
             (1)(2)(3)(4)(5)(6&7), (8)

Part 7 - IVP4407: Curriculum Development and Assessment